physical installation of Windows 10 running under VMplayer 12.5 on Fedora 24
Firstly, anyone wanting to do this needs to read this from FDS-Team - all the information here is based on their investigations and I've documented my own experience trying to run a Windows 10 installation that co-habits with Linux (Fedora 24) on my Asus laptop.
The FDS-Team document laid out the main steps for getting their Windows 7 physical system working within VMware:
- find current disk layout
- create an file image to represent the bootsector (matching the disk block size) and create s/w RAID of the partitions required by Windows
- replicate the real partition table onto the s/w RAID disk
- boot your VM
Finally, the FDS-Team document did layout various risks such as Windows becoming de-activated and potential of data corruption if you made any mistakes. For me, I aquired the Asus with no intention to use Windows 10 - I had already a working VMware image of 32bit WinXP that I was going to run on my laptop (although last WinXP released iTunes will not support IOS 10), but curiosity and the challenge got the better of me.
Again, I did not care if I totally killed my Windows 10 installation - if you care, make sure you can recover your installation.
The seller of this laptop provided me an 16GB Windows recovery USB that was created from the Windows 10 installation that included the system files allowing FULL re-installation - obviously I didn't believe him and created my own (it took a good 30mins to do). One note though, the resulting USB appears to be a disk image with no partitions on it - you can however forcibly ask linux to mount it.
Getting started - finding the partition layout
I'm running Fedora 24 with Linux 4.8.4-200.fc24.x86_64 and VMware VMplayer 12.5.1.The laptop is a core i3-2365M dual core hyperthreaded 1.4Ghz CPU with 4GB of ram - the disk has a GPT partition table and the bios is EFI. I mention this as it's important for the tasks we need to follow.
The 500GB disk was split in a strange way from the previous owner but luckily, all the Windows stuff appears at the start of the disk.
$ fdisk /dev/sda
Disk /dev/sda: 465.8 GiB, 500107862016 bytes, 976773168 sectors
Units: sectors of 1 * 512 = 512 bytes
Sector size (logical/physical): 512 bytes / 4096 bytes
I/O size (minimum/optimal): 4096 bytes / 4096 bytes
Disklabel type: gpt
Disk identifier: 6D9B2FC9-B6DD-4399-8F34-26385B6622E1
Device Start End Sectors Size Type
/dev/sda1 2048 616447 614400 300M EFI System
/dev/sda2 616448 2459647 1843200 900M Windows recovery environment
/dev/sda3 2459648 2721791 262144 128M Microsoft reserved
/dev/sda4 2721792 392505343 389783552 185.9G Microsoft basic data
/dev/sda5 392505344 393431039 925696 452M Windows recovery environment
/dev/sda6 393431040 393433087 2048 1M BIOS boot
/dev/sda7 934809600 976773119 41963520 20G Windows recovery environment
/dev/sda8 393433088 393627647 194560 95M EFI System
/dev/sda9 394407936 934809599 540401664 257.7G Linux LVM
/dev/sda10 393627648 394407935 780288 381M Linux filesystem
Partition table entries are not in disk order.
The bold items (partitions 1-4) represent the Windows 10 installation, note the Microsoft Reserve partition along the data partition. This physical disk layout will be recreated at the start of our software RAID device that we'll create later but first we need some more information. As we note that this is GPT partition we need some additional information that's part of the GPT partition table - we'll find this using Disk /dev/sda: 465.8 GiB, 500107862016 bytes, 976773168 sectors
Units: sectors of 1 * 512 = 512 bytes
Sector size (logical/physical): 512 bytes / 4096 bytes
I/O size (minimum/optimal): 4096 bytes / 4096 bytes
Disklabel type: gpt
Disk identifier: 6D9B2FC9-B6DD-4399-8F34-26385B6622E1
Device Start End Sectors Size Type
/dev/sda1 2048 616447 614400 300M EFI System
/dev/sda2 616448 2459647 1843200 900M Windows recovery environment
/dev/sda3 2459648 2721791 262144 128M Microsoft reserved
/dev/sda4 2721792 392505343 389783552 185.9G Microsoft basic data
/dev/sda5 392505344 393431039 925696 452M Windows recovery environment
/dev/sda6 393431040 393433087 2048 1M BIOS boot
/dev/sda7 934809600 976773119 41963520 20G Windows recovery environment
/dev/sda8 393433088 393627647 194560 95M EFI System
/dev/sda9 394407936 934809599 540401664 257.7G Linux LVM
/dev/sda10 393627648 394407935 780288 381M Linux filesystem
Partition table entries are not in disk order.
gdisk.# obtain GPT disk info
$ gdisk -l /dev/sda
GPT fdisk (gdisk) version 1.0.1
Partition table scan:
MBR: protective
BSD: not present
APM: not present
GPT: present
Found valid GPT with protective MBR; using GPT.
Disk /dev/sda: 976773168 sectors, 465.8 GiB
Logical sector size: 512 bytes
Disk identifier (GUID): 6D9B2FC9-B6DD-4399-8F34-26385B6622E1
Partition table holds up to 128 entries
First usable sector is 34, last usable sector is 976773134
Partitions will be aligned on 2048-sector boundaries
Total free space is 2029 sectors (1014.5 KiB)
Number Start (sector) End (sector) Size Code Name
1 2048 616447 300.0 MiB EF00 EFI system partition
2 616448 2459647 900.0 MiB 2700 Basic data partition
3 2459648 2721791 128.0 MiB 0C01 Microsoft reserved ...
4 2721792 392505343 185.9 GiB 0700 Basic data partition
5 392505344 393431039 452.0 MiB 2700
6 393431040 393433087 1024.0 KiB EF02
7 934809600 976773119 20.0 GiB 2700 Basic data partition
8 393433088 393627647 95.0 MiB EF00 EFI System Partition
9 394407936 934809599 257.7 GiB 8E00
10 393627648 394407935 381.0 MiB 8300
# find additional per partition information
$ gdisk /dev/sda
...
Expert command (? for help): o
Disk size is 976773168 sectors (465.8 GiB)
MBR disk identifier: 0x3E1AB738
MBR partitions:
Number Boot Start Sector End Sector Status Code
1 1 976773167 primary 0xEE
Command (? for help): i
Partition number (1-10): 1
Partition GUID code: C12A7328-F81F-11D2-BA4B-00A0C93EC93B (EFI System)
Partition unique GUID: 01F9031F-4DC3-45F8-A77A-A217E12BE63D
First sector: 2048 (at 1024.0 KiB)
Last sector: 616447 (at 301.0 MiB)
Partition size: 614400 sectors (300.0 MiB)
Attribute flags: 0000000000000000
Partition name: 'EFI system partition'
Command (? for help): i
Partition number (1-10): 2
Partition GUID code: DE94BBA4-06D1-4D40-A16A-BFD50179D6AC (Windows RE)
Partition unique GUID: 30300AF6-38DD-4D4F-85F9-7F87BF71C3FF
First sector: 616448 (at 301.0 MiB)
Last sector: 2459647 (at 1.2 GiB)
Partition size: 1843200 sectors (900.0 MiB)
Attribute flags: 0000000000000001
Partition name: 'Basic data partition'
Command (? for help): i
Partition number (1-10): 3
Partition GUID code: E3C9E316-0B5C-4DB8-817D-F92DF00215AE (Microsoft reserved)
Partition unique GUID: D48FC0D8-A70B-485B-B966-1E2475FFF08F
First sector: 2459648 (at 1.2 GiB)
Last sector: 2721791 (at 1.3 GiB)
Partition size: 262144 sectors (128.0 MiB)
Attribute flags: 0000000000000000
Partition name: 'Microsoft reserved partition'
Command (? for help): i
Partition number (1-10): 4
Partition GUID code: EBD0A0A2-B9E5-4433-87C0-68B6B72699C7 (Microsoft basic data)
Partition unique GUID: 1748A8C8-CECA-4B3C-B4A0-F54F95A7A59B
First sector: 2721792 (at 1.3 GiB)
Last sector: 392505343 (at 187.2 GiB)
Partition size: 389783552 sectors (185.9 GiB)
Attribute flags: 0000000000000000
Partition name: 'Basic data partition'
In hindsight, the creation of the GPT on the $ gdisk -l /dev/sda
GPT fdisk (gdisk) version 1.0.1
Partition table scan:
MBR: protective
BSD: not present
APM: not present
GPT: present
Found valid GPT with protective MBR; using GPT.
Disk /dev/sda: 976773168 sectors, 465.8 GiB
Logical sector size: 512 bytes
Disk identifier (GUID): 6D9B2FC9-B6DD-4399-8F34-26385B6622E1
Partition table holds up to 128 entries
First usable sector is 34, last usable sector is 976773134
Partitions will be aligned on 2048-sector boundaries
Total free space is 2029 sectors (1014.5 KiB)
Number Start (sector) End (sector) Size Code Name
1 2048 616447 300.0 MiB EF00 EFI system partition
2 616448 2459647 900.0 MiB 2700 Basic data partition
3 2459648 2721791 128.0 MiB 0C01 Microsoft reserved ...
4 2721792 392505343 185.9 GiB 0700 Basic data partition
5 392505344 393431039 452.0 MiB 2700
6 393431040 393433087 1024.0 KiB EF02
7 934809600 976773119 20.0 GiB 2700 Basic data partition
8 393433088 393627647 95.0 MiB EF00 EFI System Partition
9 394407936 934809599 257.7 GiB 8E00
10 393627648 394407935 381.0 MiB 8300
# find additional per partition information
$ gdisk /dev/sda
...
Expert command (? for help): o
Disk size is 976773168 sectors (465.8 GiB)
MBR disk identifier: 0x3E1AB738
MBR partitions:
Number Boot Start Sector End Sector Status Code
1 1 976773167 primary 0xEE
Command (? for help): i
Partition number (1-10): 1
Partition GUID code: C12A7328-F81F-11D2-BA4B-00A0C93EC93B (EFI System)
Partition unique GUID: 01F9031F-4DC3-45F8-A77A-A217E12BE63D
First sector: 2048 (at 1024.0 KiB)
Last sector: 616447 (at 301.0 MiB)
Partition size: 614400 sectors (300.0 MiB)
Attribute flags: 0000000000000000
Partition name: 'EFI system partition'
Command (? for help): i
Partition number (1-10): 2
Partition GUID code: DE94BBA4-06D1-4D40-A16A-BFD50179D6AC (Windows RE)
Partition unique GUID: 30300AF6-38DD-4D4F-85F9-7F87BF71C3FF
First sector: 616448 (at 301.0 MiB)
Last sector: 2459647 (at 1.2 GiB)
Partition size: 1843200 sectors (900.0 MiB)
Attribute flags: 0000000000000001
Partition name: 'Basic data partition'
Command (? for help): i
Partition number (1-10): 3
Partition GUID code: E3C9E316-0B5C-4DB8-817D-F92DF00215AE (Microsoft reserved)
Partition unique GUID: D48FC0D8-A70B-485B-B966-1E2475FFF08F
First sector: 2459648 (at 1.2 GiB)
Last sector: 2721791 (at 1.3 GiB)
Partition size: 262144 sectors (128.0 MiB)
Attribute flags: 0000000000000000
Partition name: 'Microsoft reserved partition'
Command (? for help): i
Partition number (1-10): 4
Partition GUID code: EBD0A0A2-B9E5-4433-87C0-68B6B72699C7 (Microsoft basic data)
Partition unique GUID: 1748A8C8-CECA-4B3C-B4A0-F54F95A7A59B
First sector: 2721792 (at 1.3 GiB)
Last sector: 392505343 (at 187.2 GiB)
Partition size: 389783552 sectors (185.9 GiB)
Attribute flags: 0000000000000000
Partition name: 'Basic data partition'
/dev/md0 could actually be much simpler thanks to sgdisk - this util can backup and reinstall GPT to different devices. For us we'd backup from physical, load to virtual, modify the virtual disk using gdisk removing unnecessary partitions and then force recalculations/verification of GPT and then saving.$ sgdisk --backup=gpt.bin /dev/sda
$ sgdisk --load-backup=gpt.bin /dev/md0
$ gdisk /dev/md0
# delete unnneded partitions and force verify
$ sgdisk --load-backup=gpt.bin /dev/md0
$ gdisk /dev/md0
# delete unnneded partitions and force verify
Creating the required VM partition table
At this point we can start creating the various local image files. For our GPT partition, we need a boot record to go at the start of our 'disk' - the disk will be created usingmdadm creating a s/w RAID device that will wrap our on-disk partition table, required Windows partitions and on-disk GPT partition table backup.The second on disk image (the GPT part-tbl backup) is required as part of the GPT standard as noted by the FDS author in the comments of their article:
You will also need to create an additional image file with the size of a sector and append it to the end of the raid. ... you cantell gdisk to copy the content to the end of the disk. If you forget to add this sector Windows might create the backup on it's own and overwrite the last sector of your filesystem.
To progress, we need to pay attention to the information collected earlier:
- disk sector size
- start/end blocks for each partition
- disk GUID
- each partition type and GUID
Creating on-disk image files
To create this we need the disk sector size (param tobs=) and the start of the first partition (param to count=).$ dd if=/dev/zero of=head.bin count=2048 bs=512
$ dd if=/dev/zero of=tail.bin count=2048 bs=512
The second disk image need not be this size but I got lazy.$ dd if=/dev/zero of=tail.bin count=2048 bs=512
Creating s/w RAID disk
$ modprobe linear
# as root or via sudo
$ losetup /dev/loop0 head,bin
$ losetup /dev/loop1 tail.bin
# create the s/w RAID - i have 4 partitions to add plus the start/end images
# ... a total of 6 devices
$ mdadm --build /dev/md0 \
--level=linear
--raid-devices=6
/dev/loop0 /dev/sda[1-4] /dev/loop1
# give the ownership of the new RAID device to the non-root user
$ chown ray /dev/md0
# add a GPT boot record (not sure if really needed...)
$ dd bs=440 count=1 conv=notrunc if=/usr/share/syslinux/gptmbr.bin of=/dev/md0
Note that this s/w RAID setup will disappear everytime the machine is rebooted so it'll be worthwhile to put this into a script and these tasks can be added as a systemd service and tied in with vmware so that it can stop/start on boot.# as root or via sudo
$ losetup /dev/loop0 head,bin
$ losetup /dev/loop1 tail.bin
# create the s/w RAID - i have 4 partitions to add plus the start/end images
# ... a total of 6 devices
$ mdadm --build /dev/md0 \
--level=linear
--raid-devices=6
/dev/loop0 /dev/sda[1-4] /dev/loop1
# give the ownership of the new RAID device to the non-root user
$ chown ray /dev/md0
# add a GPT boot record (not sure if really needed...)
$ dd bs=440 count=1 conv=notrunc if=/usr/share/syslinux/gptmbr.bin of=/dev/md0
The systemd service/unit file to describe the actions:
# /etc/systemd/system/vmware-win10-virtdsk.service
[Unit]
Description=VMware Win10 virtual disk
After=vmware.service
[Service]
Type=oneshot
ExecStart=/usr/bin/VMware-Win10-virtdsk start
ExecStop=/usr/bin/VMware-Win10-virtdsk stop
RemainAfterExit=yes
>[Unit]
Description=VMware Win10 virtual disk
After=vmware.service
[Service]
Type=oneshot
ExecStart=/usr/bin/VMware-Win10-virtdsk start
ExecStop=/usr/bin/VMware-Win10-virtdsk stop
RemainAfterExit=yes
The script to do the work:
# /usr/bin/VMware-Win10-virtdsk
#!/bin/sh
if [ $# -ne 1 ]; then
echo "usage: $0 [ start | stop | restart ]"
exit 1
fi
#SUDO="sudo"
MODPROBE="${SUDO} modprobe"
LOSETUP="${SUDO} losetup"
MDADM="${SUDO} mdadm"
CHOWN="${SUDO} chown"
VM_GPTIMG_DIR=/usr/share/vmware-win10-virtdsk
start() {
echo "starting"
${MODPROBE} linear
${LOSETUP} /dev/loop0 ${VM_GPTIMG_DIR}/head.bin && \
${LOSETUP} /dev/loop1 ${VM_GPTIMG_DIR}/tail.bin && \
${MDADM} --build /dev/md0 --level=linear \
--raid-devices=6 \
/dev/loop0 \
/dev/sda[1-4] \
/dev/loop1 && \
${CHOWN} ray /dev/md0
}
stop() {
echo "stopping"
if [ ! -b /dev/md0 ]; then
echo "no /dev/md0 device - service not previously started?"
return 1
fi
# this scould stillbe lies - havent checked we're acv on md0
${MDADM} --stop /dev/md0
${LOSETUP} -d /dev/loop1
${LOSETUP} -d /dev/loop0
}
restart() {
stop
start
}
RET=0
case $1 in
start|stop|restart)
"$1"
RET=$?
;;
*)
echo "usage: $(basenae $0) [ start | stop | restart ]"
echo " unknown param $1"
RET=10
;;
esac
exit $RET
The disk images created earlier:
# /usr/share/vmware-win10-virtdsk
# dir of the GPT head/tail images
root root 1048576 Nov 29 09:14 /usr/share/vmware-win10-virtdsk/head.bin
root root 1048576 Nov 29 09:14 /usr/share/vmware-win10-virtdsk/tail.bin
># dir of the GPT head/tail images
root root 1048576 Nov 29 09:14 /usr/share/vmware-win10-virtdsk/head.bin
root root 1048576 Nov 29 09:14 /usr/share/vmware-win10-virtdsk/tail.bin
Once all of these are in place:
$ systemctl daemon-reload
$ systemctl status vmware-win10-virtdsk
$ systemctl enable vmware-win10-virtdsk
$ systemctl start vmware-win10-virtdsk
$ systemctl status vmware-win10-virtdsk
$ systemctl enable vmware-win10-virtdsk
$ systemctl start vmware-win10-virtdsk
Re-creating the physical partition table
This is the section that needs a little care to match up partitions. Whilst the previous section was operating on an image that was on disk (not touching real partitions) if we get the partition table wrong for the VM, we could be potentially risking the data on the partitions on disk.$ gdisk /dev/md0
Using the information discovered about the GPT earlier, we need to reset the GUIDs for the disk and the details for each partition.
match disk GUID ('g' in expert mode) - we need to match this to the real disk GUID
create protective mbr ('n' in expert mode)
for each partition on real disk
create
# match up values with real partitions
set partition GUID ('c' in expert mode)
set attribute flags ('a' in expert mode)
recompute CHS ('h' in expert mode)
write the partition out and quite ('w' in normal mode)
>create protective mbr ('n' in expert mode)
for each partition on real disk
create
# match up values with real partitions
set partition GUID ('c' in expert mode)
set attribute flags ('a' in expert mode)
recompute CHS ('h' in expert mode)
write the partition out and quite ('w' in normal mode)
For me, the only partition with different attributes flags was partition #2, marking bit 0 (set 1) indicating that it was a system partition.
Create VMware VM and final configuration
Once the partition table is created on the virtual RAID disk, we can setup VMware to create a new VM. For my system I assigned half the number of cores and hallf the amount RAM. The important section is the harddisk - as the harddisk is a SATA drive you should create a SATA device (not the recommended SCSI device) and point it at the /dev/md0 device we've created. For the network interface, I assigned the same MAC address as the physical MAC.At this point save the settings and then EXIT VMware - before we boot we need to force this new VM to use EFI firmware; this isn't selectable in the menus but we can enable EFI bios by editting the new .vmx file, adding
firmware = "efi"
near the top of the vmx file. Without this setting, VMware boots and reports no OS found.Getting read to boot the physical installation in the VM
If the Windows installation was not shutdown fully (apparently Windows 10 always puts itself in some form of hibernation mode) you need to boot into Windows and shut it down runningshutdown /s /f /t 0
This does take some time to shutdown.The Resuts .. and consequences
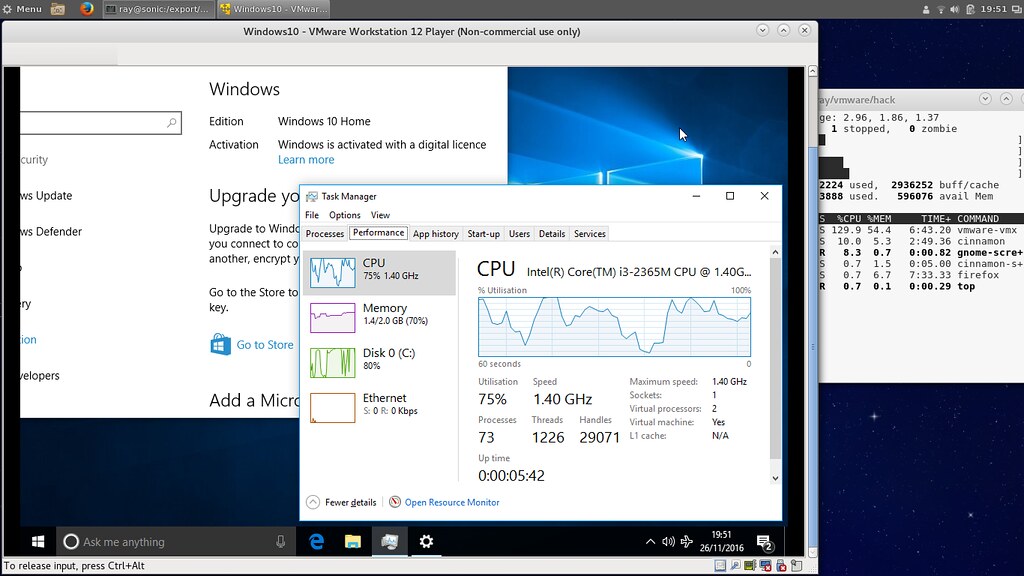
And now to boot the VM... IT WORKS!It's not terribly slow on this Asus but it's not lightning quick - it was never lightning quick but it works. However when we check the Windows activation, its now NOT active. I was able to re-activate by shutting down fully (see above) and then re-activating: no license key was required as with most new machines, Windows uses digital certificates - when a network cable was attached, Windows reactivated itself again.
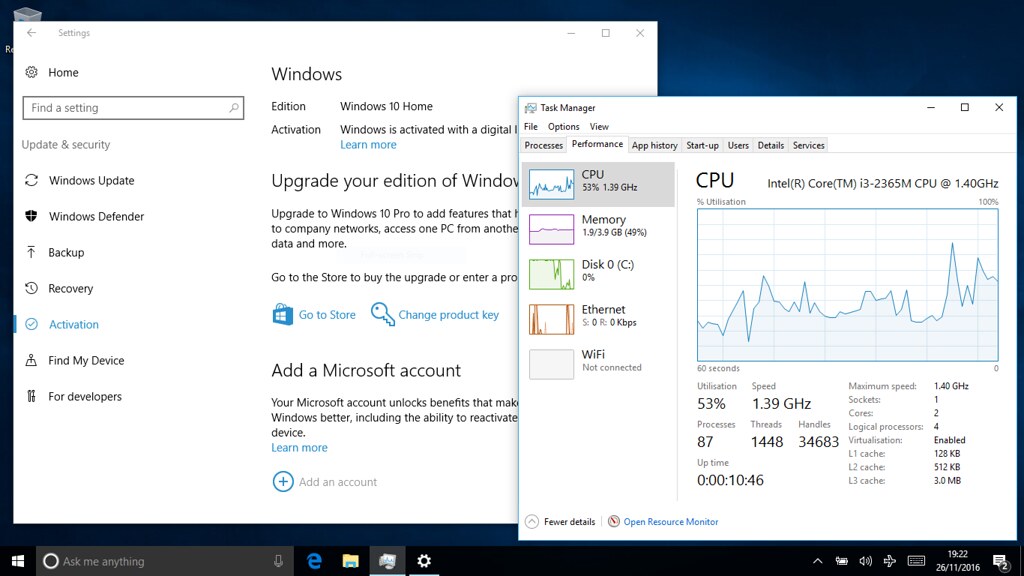
physical Windows 10 activation status
Shutting down fully (
shutdown /s /f /t 0) and rebooting back into Linux and restarting VMware again. This time Windows reports that the system is STILL activated!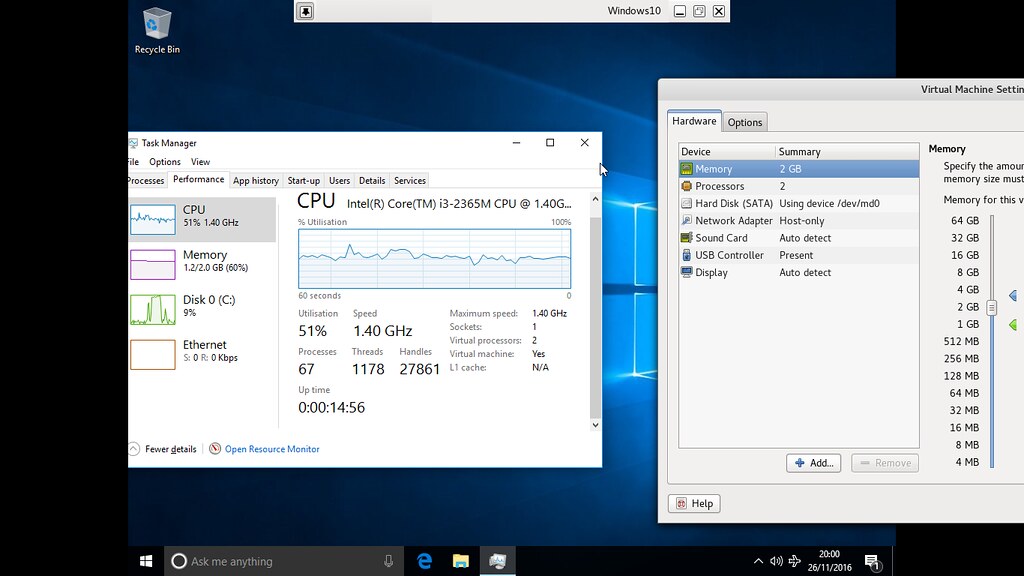
Once verified activated, I reset the VM network interface to be host-only and intend to share files using the VMware shared folders option - there's no need for Windows to bleed information onto the net.
Note that I didn't install VMware Tools - there appears not to be a big problem (unlike WinXP where without the VMTools the display was slooooowwww) and I don't know of any issues if I need (?) to physically boot into Windows. Without VMTools, however, you can not enable/disable the VM shared folders whilst the VM is running.
Interesting, Windows knows that it is operating as a VM as noted in task manager.
To clean up, I went back into bare metal Windows and linked the activated digital licence with an email account - this is supposed to help with simple reactivation in case you change your hardware.
As I mostly expect to be booting this Windows installation from Linux mostly, I will take the chance of the normal Windows shutdown (ie hibernation) and if I boot from bare metal, I'll let Windows panic on the hibernated disk image not mismatching with the bare metal.
... now to install deal with iTunes for IOS 10 devices.
No comments:
Post a Comment