
The first problem that you will have to recognise is that, whilst you may have a correctly calibrated monitor, different print labs will use different printers and different paper. Such differences at the print stage need to be addressed - the role of output colour spaces and profiles tries to resolve but there are still issues that need to be noted.
From RAW
When opening the RAW file in a processing engine such as CNX2, the first thing (in simplistic terms) that needs to happen is that the information needs to be mapped into a working colour space which the system uses to process/display the image. The common colour spaces, sRGB/aRGB/WideRGB/ProPhotoRGB, all provide different gaumet of colours - ie, the number of colours that can be defined differ between the colour spaces. Therefore, you may wish to map your RAW file into the widest working colour space (such a ProPhotoRGB) in your RAW processing engine for your initial edits before converting for final output print.
Thom Hogan's Q&A description of the RAW files is here
WB/Colour Correction
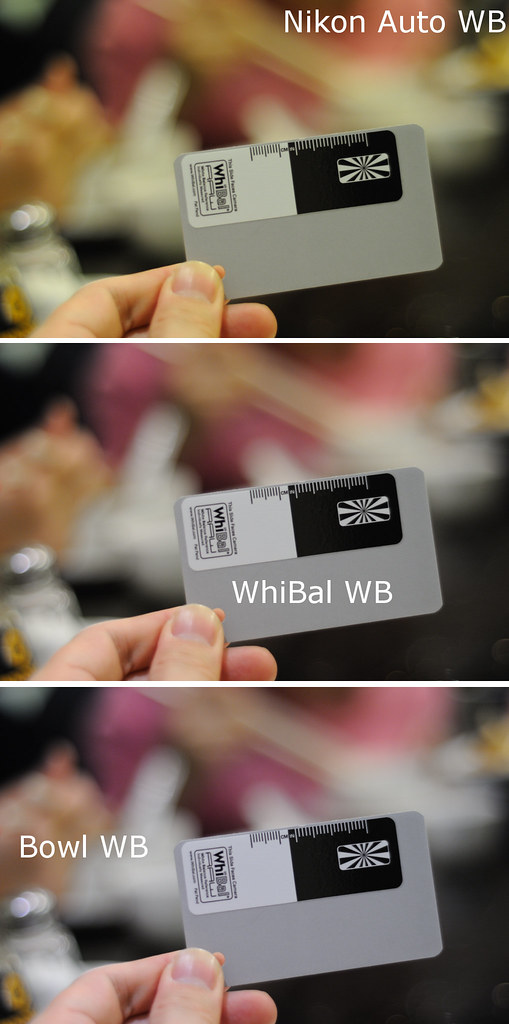
One the first corrections that may be performed is white balance correction (if needed). I've been using a WhiBal as my reference point when required (mostly available light). To force CNX2 to use your reference point/frame, which can be copied/saved and applied to subsequent RAW files, navigate to the Develop -> Camera section and use the marquee sample selecting an area of the grey reference point as seen below:
Whilst most cameras normally make a good guess at WB, the grey reference clearly cleans up the image. Notice the whites in the before/after WB correction.

Another (sometimes less accurate) way to provide a reference point for white balance is to simply use a neutral/white object that is within the frame (napkins, white shirts ...). I personally have had mixed results but this quick/inexpensive alternative does get you pretty close that you can tweak and be reasonably happy.
Be aware when setting your white balance that you are actually using the white balance tool in your graphics program - I've previously seen articles suggest that you can use the set grey point tool (normally found on the curves tool along with set white/black point): this is total garbage. The grey/white/black point tools are used to adjust the exposure of the frame and not for white balance.
Colour Space Conversion to Printer ICC Profiles
Once the initial edits (colour balance/exposure correction etc) have been complete the image must be coverted to the output profile, in particular, the print lab's printer ICC profile (based on printer and paper used)Image soft proofing of the print lab profile conversion will ensure that the final printed output will match the display version - it is worth noting that when an image is printed on some papers, colours and brightness may shift a little so the soft proof will allow you to make any adjustments.
However, there is one thing to be aware. The rendered RAW image may a colour gaumet that exceeds the print gaumet and during the conversion to the output profile there are decisions that are made to determine how to map out of gaumet colours: rendering intent. The choices:
- Relative
- Perceptual
- Absolute
- Saturation
In simple terms, colours that fall outside the output colour space can be clipped to the nearest colour (relative rendering) or the entire colour space can be shifted/squeezed (perceptual rendering) such that all colours remain within the output colour space which helps tries to retain smooth colour (ie shadow) transitions.
See the following image, which is from the Cambridge In Color article referenced below, that demonstrates this.

Absolute and saturation rendering are less commonly used but apply a combination of the previous by adjusting the white point.
A more detailed discussion of colour space conversion and rendering intents can be found here Cambridge in Color
Output Size
The majority of the digital SLR sensors produce a 3:2 capture so correct aspect full sized prints can be 6x4, 9x6, 12x8 etc. It is worth noting that print labs may require your images to be a specific PPI (not DPI). In simple terms, points per inch (PPI) determines how big a print can be on a given size - how many points are in a given peice of (photo paper) realestate without posterisation.It is important that the output image is sized correctly: for instance, a print lab that offers no corrections (this is a good thing) for your images may require images at 400ppi. In CNX2, the following edit list shows the steps for adjusting to a desired 12x8 400ppi print (see Step 2 and the Output Size section):

Noice that CNX2 actually specifies the resolution in DPI.
The final step would be to apply output sharpening to the image.
The colour space conversion/ppi resizing/sharpening steps can saved as a CNX2 multiple settings adjustment which can be applied to multiple images in batch mode. Unfortunately, for each out size (12x8, 9x6 ...) a different adjustment setting needs to be saved.
Print Labs
Recently, in the UK, I've had great service from ProAm Imaging who delivered very high quality 12x8 RGB prints via their 400ppi D-Lab2 machine onto Fuji CA DPII Lustre (matt) paper (ICC profile available via their website). I had originally chosen ProAm as they were one of the few online print labs that provided the print machine spec and the output paper ICC profile along with the ability to request NO automatic adjustments made at the print machine. Whilst there were other RGB labs that provided similar services (albiet mostly on Fuji Frontier 300ppi machines), the service from this company was outstanding and was very pleased with the results.However, I did run into a small soft-proofing issue during output profile conversion (apparent loss of contrast on colour space conversion in RAW) on an 32bit x86 WinXP/CNX2 environment which did NOT affect the final print.
In short, a RAW image in CNX2 (in the ProPhoto working colour space) when converted to the print lab's output ICC profile resulted in an apparent haze/loss of contrast.Consequently, I had the same test print produced on the same Fuji paper via a different (Fuji Frontier based) lab but the prints were indistinguisable.
However, when the pre/post conversion was saved as seperate 100% jpegs/tiffs and viewed in a colour/ICC compliant viewer (such as Firefox 3.5) which recognises and renders the embedded ICC profile, the pre/post images looked identical. Moreover, the post conversion image in the ICC aware viewer appeared without the haze to the post conversion RAW image as viewed in CNX2 suggesting that there may be a bug in CNX2's rendering.
One thing that is worth noting is that whilst some 'commercial/mass market' online printer labs (snapfish/photobox etc) may provide output paper ICC profiles, there is no guarantee that their print machines will honour the image files without applying machine configured automated contrast/saturation corrections. This point alone would make me look elsewhere - there is no way I would wish a machine to make any adjustments to the images that I have corrected for final output.
No comments:
Post a Comment