
Exposure with strobes in a totally controlled environment and also metering an ambient only scene.
Irrespective of artificial or natural environments, metering is used to determine the desired exposure. The meter will allow you to determine how to place your exposure (the diffused highlight) but there's a distinction between a reflective vs a incident meter. A reflective meter will yield a reading in relation to a hypothetical 18% grey value whereas an incident meter (with standard dome attachment) will yield an reading to represent a 3D object.
When dealing with exposure/light control, there are a number of concepts that need to be understood:
- specular highlight - mirror image of the light source as it appears on the subject
- diffused highlight - the light (and luminosity/perceived brightness) that shows the true tonality of the subject in relation to 18% gray: the diffused value may be chosen to be over/under exposed depending on application/desire
- shadow area - area of subject that is underexposed/receiving less light than the diffused highlight
photographic white: 2 1/3 stops above 18%which is also referenced in his 1991 "Live at Brooks Institute of Photography" talk but note that different mediums have different possible exposure ranges.
photographic black: 4 1/3 stops below 18%
Strobes
A number of Dean Collins' lighting videos show his incident light meter readings made with the dome facing the light source whereas Sekonic's howto articles explicitly state
When you are taking an incident reading from the subject’s position, the meter should be held so that the white dome faces the camera lens, not the light source
Personally, for final incident exposure value, I point the dome towards the camera from subject position.
Dome: Point it Forward
But what is a transitional tonal area? A simple and standard area is under the subject's chin (in the subject is facing camera). Such an area is simply an area that is an area that is middle of the road, where its neither purely in the highlight area or in the all in the shadow area.
For a handheld incident flash/light meter, the metered value is 'correct' - if the incident meter in front of a white wall says "f/4", f/4 will give you a white wall. Conversely, if you point a reflective spot meter at a white wall and it tells you f/4 and that is your exposure value, your exposure will give you a mid grey wall. This is an important distinction.
Irrespective of the incident meter reading, I always prefer the incident reading to be a 1/3 above shooting aperture.
Dome: Point it At the lights
When you require a specific lighting ratio, each light should be metered individually from subject position (with the dome retracted) and pointed at the strobe whilst the other lights are off. This will give an accurate reading for that light. When all lights have been metered you have your lighting ratios. However, if you have lights that overlap then those areas will need some compensation since those areas will be brighter than the separate readings.
The actual exposure reading is still made with the meter facing the camera with ALL lights on and the meter in a transitional tonal zone.
A contribution on the Strobist group summarises this situation:
Use the meter to find the intensity of each light so that you will understand ratios of the image. The final exposure determination is made from having the meter's ball facing the lens.A further expanse on the subject is available at Lighting Essentials.
Let's say I have a three light setup.Main from off camera right.I can make individual meter readings of each light. I will generally start with the main light.
Kicker from behind subject left.
Hairlight from above and back of subject.
Adding a fill card to camera left to mitigate shadows.
Main light is f-8.
I then make the determinations of where I want the kicker and hair light to fall. So if I want a hairlight that is subtle, I can make that light f8. If I want it brighter, I can add power to that light to bring it up to 9, 10 or even 11.
The kicker light is then added to the point that I want as well. If I want it to be quite bright, then I make it f9 or f10. Or more if I want that look. Now of course these lights will add to the overall a bit because they are both hitting the fill card.
I go back to the main with the ball forward to camera. It may now be f-9 reflecting a bit of the light that was added around. That would be my exposure. Does that slight tweak change the ratios of the main to the back/side? Yes, but not terribly so - you can adjust from there. If you want to keep the lights from hitting the fill card, that would keep the ratios close to your first set.
The reflective mode of an incident meter tends to be used less frequently when using strobes/flashes. However one use of reflective flash metering comes when trying to light for blow away white seemless.
Ambient Only Scenes
The camera's meter will show tell you when you are bang on, but this also means its telling you that with the current zero'd out exposure will render your spot metered element as middle grey. But most things we want just don't look good rendered as middle grey.
This means again you need to have some knowledge about what you're pointing at and how to expose for your subject. We really need to have some understanding of zonal placement - this Planet Neil article discusses this well but you should understand that this just comes straight back to Ansel Adams' Zone System which is discussed by Norman Koren.
Simply, the Zone system divides the tonal range into 11 distinct zones, 0-10, where a change in a region equates to one stop and where zone 0 is black, zone 10 is pure black and zone 5 is bang in the middle - middle grey as seen by our light meters.
Reproduced for reference from the Koren article:
| Low values Zone 0 | Complete lack of density in the negative image, other than film base density plus fog. Total black in the print. We will omit zone 0 from the remainder of this tutorial; zone 1 will be considered pure black. |
| Zone 1 | Effective threshold. First step above complete black in the print. Slight tonality, but no texture. |
| Zone 2 | First suggestion of texture. Deep tonalities, representing the darkest part of the image in which some detail is required. |
| Zone 3 | Average dark materials. Low values showing adequate texture. |
| Middle values Zone 4 | Average dark foliage. Dark stone. Landscape shadow. Recommended shadow value for portraits in sunlight. |
| Zone 5 | Clear north sky (panchromatic rendering). Dark skin. Gray stone. Average weathered wood. Middle gray (18% reflectance). |
| Zone 6 | Average Caucasian skin value. Light stone. Shadows in snow in sunlit snowscapes. |
| High values Zone 7 | Very light skin. Light gray objects. Average snow with acute side lighting. |
| Zone 8 | Whites with textures and delicate values (not blank whites). Snow in full shade. Highlights on Caucasian skin. |
| Zone 9 | Glaring white surfaces. Snow in flat sunlight. White without texture. (The only subjects higher than Zone 9 would be light sources; they would be rendered as the maximum white value of the paper surface. |
As to placing the desired exposure, this is one of those situations where experience of others counts - I've seen the following traditional recommendations for spot metering when placing the correct exposure:
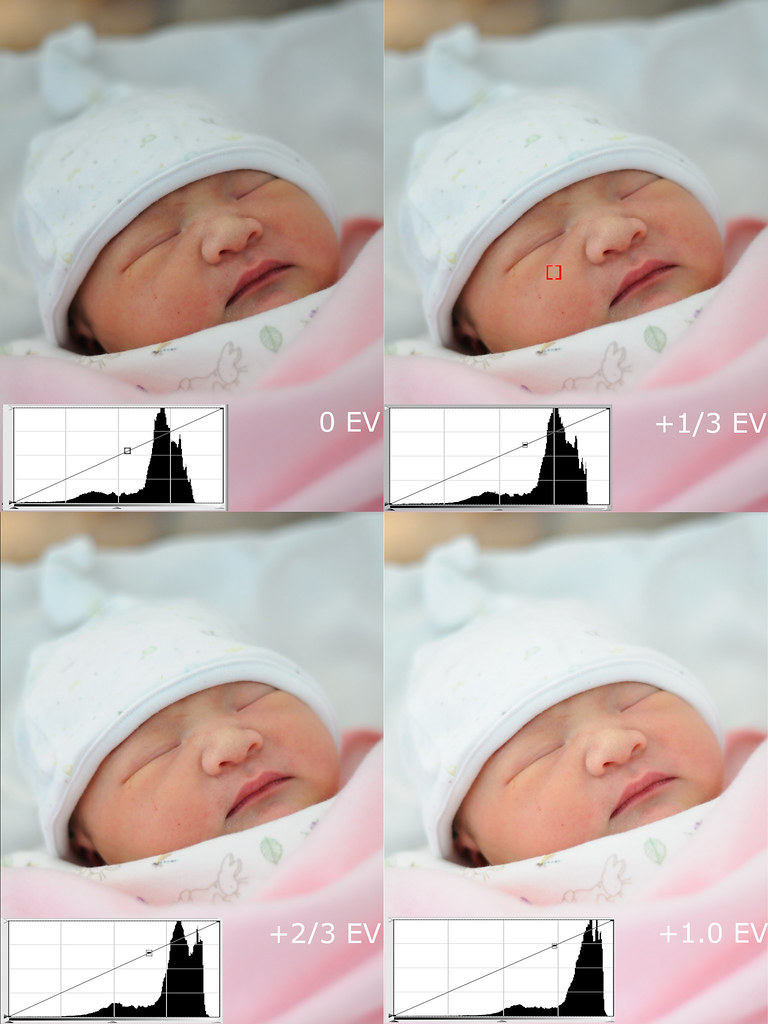
Skin tones - generally best exposed +1 stop (placing them into zone 6)However, I have found that for light (mostly Chinese and Caucasian) skin tones, the most pleasing placement are within the +1/2 .. +2/3 exposure range with the Nikon D300 body - an area on the cheek, which is under even illumination (not hot/dark) and the middle tone for all skin for the exposure, is selected and the final exposure is spot metered for the exposure. Personally, I find the +1 stop exposure to be far too hot for skin tones when using D300 BUT it is important to note that different SLR bodies may have different sensitivities.
Snow - generally best exposed +1.5 - +2 to get it looking clean white (zone 7) and not dull grey.
Sky colours - enhanced by underexposing by 2/3 of a stop.

The exposures above show the variations of exposure (exposure taken from the area marked with red bracket). The in-camera exposure was made at +1/3 and the other images are derived from the RAW file and adjusted in CNX2. The scaled down image shown does not present the differences in exposures well: larger versions here: [ FULL 14MB | 1024 wide ]
The final exposure for your image is a personal and creative choice, but personally, I find that a normal exposure for skin tones and the shift up from middle grey can differ from body to body.
Similarly, for white objects (snow/white dresses) I have found the +1 .. +1 1/3 exposure range to be sufficient for a clean looking white exposure whilst retaining detail but will also be dependant on the dynamic range of your camera.

Old school - Sunny 16
This is a working guideline that has been around for a long time (it used to be printed on most film packaging) that approximates a correct incident exposure with a front sunlit subject during the brightest part of the day. The guideline states the exposure should be 1/(ISO speed) f/16 - so film or digital ISO200 would require a 1/200 f/16.However, a lot of references to Sunny 16 don't expand on the basic f/16 guideline - for reference:
snow f/22 close 1 stop front lit f/16 -- cloudy f/11 open 1 stop soft edge shadows overcast f/8 open 2 stops barely visible shadow heavy overcast f/5.6 open 3 stops no shadow open shade f/4 open 4 stops
Furthermore, for sidelit subjects we additionally open 1 stop and backlit subjects we open 2 stops.
Finally a great many novices get hung up on f/16 but that's just one exposure - an equivalent (less diffraction friendly) exposure is 1/8000 f/2.8 ISO200
No comments:
Post a Comment