The HP boots from the 64bit live images with no issues and we find:
00:00.0 Host bridge: Intel Corporation Atom Processor D4xx/D5xx/N4xx/N5xx DMI Bridge (rev 02)
00:02.0 VGA compatible controller: Intel Corporation Atom Processor D4xx/D5xx/N4xx/N5xx Integrated Graphics Controller (rev 02)
00:02.1 Display controller: Intel Corporation Atom Processor D4xx/D5xx/N4xx/N5xx Integrated Graphics Controller (rev 02)
00:1b.0 Audio device: Intel Corporation NM10/ICH7 Family High Definition Audio Controller (rev 02)
00:1c.0 PCI bridge: Intel Corporation NM10/ICH7 Family PCI Express Port 1 (rev 02)
00:1c.1 PCI bridge: Intel Corporation NM10/ICH7 Family PCI Express Port 2 (rev 02)
00:1d.0 USB controller: Intel Corporation NM10/ICH7 Family USB UHCI Controller #1 (rev 02)
00:1d.1 USB controller: Intel Corporation NM10/ICH7 Family USB UHCI Controller #2 (rev 02)
00:1d.2 USB controller: Intel Corporation NM10/ICH7 Family USB UHCI Controller #3 (rev 02)
00:1d.3 USB controller: Intel Corporation NM10/ICH7 Family USB UHCI Controller #4 (rev 02)
00:1d.7 USB controller: Intel Corporation NM10/ICH7 Family USB2 EHCI Controller (rev 02)
00:1e.0 PCI bridge: Intel Corporation 82801 Mobile PCI Bridge (rev e2)
00:1f.0 ISA bridge: Intel Corporation NM10 Family LPC Controller (rev 02)
00:1f.2 SATA controller: Intel Corporation NM10/ICH7 Family SATA Controller [AHCI mode] (rev 02)
00:1f.3 SMBus: Intel Corporation NM10/ICH7 Family SMBus Controller (rev 02)
01:00.0 Ethernet controller: Realtek Semiconductor Co., Ltd. RTL8101E/RTL8102E PCI Express Fast Ethernet controller (rev 05)
02:00.0 Network controller: Qualcomm Atheros AR9285 Wireless Network Adapter (PCI-Express) (rev 01)
Bus 001 Device 006: ID 0bda:0138 Realtek Semiconductor Corp. RTS5138 Card Reader Controller
Bus 001 Device 002: ID 04f2:b2a6 Chicony Electronics Co., Ltd
Bus 001 Device 001: ID 1d6b:0002 Linux Foundation 2.0 root hub
Bus 005 Device 001: ID 1d6b:0001 Linux Foundation 1.1 root hub
Bus 004 Device 003: ID 0cf3:3005 Atheros Communications, Inc. AR3011 Bluetooth
Bus 004 Device 001: ID 1d6b:0001 Linux Foundation 1.1 root hub
Bus 003 Device 001: ID 1d6b:0001 Linux Foundation 1.1 root hub
Bus 002 Device 001: ID 1d6b:0001 Linux Foundation 1.1 root hub
All of the netbook's hotkeys (quickweb, display dimmer, volume up/down/mute and wifi on/off) are recognised and using the MATE desktop live USB image and the system automounts and presents to the desktop devices such as: MTP/PTP (verified by Nikon D800/D300), Apple IOS (including an iPhone 6 running iOS 9.0 and iPhone 4s running iOS 7.0.1), USB sticks and SD (including 32GB, ie SDHC) cards inserted into the inbuilt card reader.
Installation is relatively simple by after clicking the "install to harddisk" icon - the process uses the files from live image to allow a basic running installation with the same X window desktop as the live image; other packages (such as the compiler etc) and other X window managers (KDE/Gnome3/LXFC etc) can be installed later.
During installation the partition manager allows manual or automatic partitioning, also providing logical volume management. The harddisk has 3 factory installed partitions for Windows 7, recovery/factory restore and utility/tools: all of these have to be deleted via
fdisk to allow the installer to continue. A boot partition of ~500Mb should be sufficient (although 50% of this is used after installation) but this is created outside of a LVM (not easily extenable) and the rest of the space was added to a volume group: 2.5Gb was given to swap and the remaining (~227Gb) was given to the root partition - no other paritions were created, including /tmp which is now on tmpfs.The installation from the live image took ~25mins and rebooting into the newly installed (with grub boot manager) presented no issues. The following is a log/cheatsheet of post installation configuration for additional services/reconfiguration/fixes: the final installation used ~7Gb on the root partition, leaving ~209Gb free.
Misc System Wide Options
Minor env/sanity
/etc/selinux/config
# this helps for smb and other service rejects on inbound
SELINUX=disabled
/etc/bashrc
[ "$PS1" = "\\s-\\v\\\$ " ] && PS1="[\j] \u@\h:[\W]\\$ "
/etc/profile
umask 022 # from 002
/etc/inputrc
set show-all-if-ambiguous on
set editing-mode vi
# stop my eyes from bleeding with syntax highlighting
/etc/vimrc
syntax off
set nohlsearch
set sw=4 ai expandtab
# remove colours from ls output
/etc/profile.d/colorls.sh
alias ls='ls -F --color=never' 2>/dev/null
# prevent the X greeter (ie XDM) in displaying the names of all available users on the system
/etc/lightdm/lightdm.conf
greeter-hide-users = true
Roaming Ethernet: 1 device, multiple settings/interfaces
The machine has one wired ethernet port: some users may desire this single port to behave differently when in different environments, such as having a static IP address when at home but requiring a DHCP IP at other times (in public places, in the office etc). To avoid manually modifying the underlyingifcfg file, multiple interfaces can be setup with each refering to the same phsysical interface. The newer interface naming scheme (no longer eth0) derives the name based on the location of the device on the motherboard and in the case of the HP Mini 210, it is enp1s0./etc/sysconfig/network-scripts/ifcfg-enp1s0
HWADDR=10:1F:....
TYPE=Ethernet
DEFROUTE=yes
PEERDNS=no
PEERROUTES=yes
IPV4_FAILURE_FATAL=yes
IPV6INIT=no
NAME=enp1s0
UUID=1233c772-2ce4-4b49-904c-d75672037462
ONBOOT=yes
DNS1=8.8.8.8
DNS2=8.8.4.4
BOOTPROTO=none
IPADDR=192.168.0.123
PREFIX=24
GATEWAY=192.168.0.1
/etc/sysconfig/network-scripts/ifcfg-ethdhcp
HWADDR=10:1F:.....
TYPE=Ethernet
DNS1=8.8.4.4
DNS2=8.8.4.4
DEFROUTE=yes
PEERDNS=no
PEERROUTES=yes
IPV4_FAILURE_FATAL=no
IPV6INIT=yes
IPV6_AUTOCONF=yes
IPV6_DEFROUTE=yes
IPV6_PEERDNS=no
IPV6_PEERROUTES=yes
IPV6_FAILURE_FATAL=no
IPV6_PRIVACY=no
NAME=ethdhcp
BOOTPROTO=dhcp
DEVICE=enp1s0
ONBOOT=no
Notice that in the second interface (named
ethdhcp) the following options differ: ONBOOT=no, NAME=ethdhcp, BOOTPROTO=dhcp however the DEVICE= refers to the same phsysical interface in both files. With these interfaces in place, you may bring up (via ifup or the NetworkManager) accordingly.One other thing to note - the default route MUST be set for the static interface, otherwise you will find that if you try to
ping www.google.com you will find that it hangs even though your browser is quite able to find the host. The routing table should look like this:Kernel IP routing table
Destination Gateway Genmask Flags Metric Ref Use Iface
0.0.0.0 192.168.0.1 0.0.0.0 UG 100 0 0 enp1s0
192.168.0.0 0.0.0.0 255.255.255.0 U 100 0 0 enp1s0
Destination Gateway Genmask Flags Metric Ref Use Iface
0.0.0.0 192.168.0.1 0.0.0.0 UG 100 0 0 enp1s0
192.168.0.0 0.0.0.0 255.255.255.0 U 100 0 0 enp1s0
If is the first line with the
UG flag that is important and this will be enabled accordingly with the config above. For DHCP connections, the default route is configured automatically when PEERROUTES=y is also set (recommended). However, most DCHPs will also provide some other defaults as part of the client setup: /etc/resolv.conf may contain a default nameserver reference that you don't want. Typically, for DHCP clients I would use in the ifcfg- file:BOOTPROTO=dhcp
# specify a client id to the DHCP server
DHCP_HOSTNAME=some-client-id-or-this-hostname
# prevent network service from updating /etc/resolv.conf
# with the DNS servers received from a DHCP server.
PEERDNS=no
IPV6_PEERDNS=no
DNS1=8.8.4.4
DNS2=8.8.8.8
# specify a client id to the DHCP server
DHCP_HOSTNAME=some-client-id-or-this-hostname
# prevent network service from updating /etc/resolv.conf
# with the DNS servers received from a DHCP server.
PEERDNS=no
IPV6_PEERDNS=no
DNS1=8.8.4.4
DNS2=8.8.8.8
rc.local
There are some tasks that you may to be executed as the last step of bootup - primarily I've historically used this to force load kernel drivers or to force tasks that would normally be handled by cron: of course cron is of no use given that the machine is not likely to be up 24/7 so I also use this to clear out junk and rotate logfiles.This file must be valid shell script, owned by root executable.
/etc/rc.d/rc.local
#!/bin/bash
# force clock refresh - this is likely to fail if the network/eth is not available
# and should realisitcally go into post ifup scripts
#/usr/sbin/ntpdate uk.pool.ntp.org 2>/dev/null &
# this attempts to bring the system clock back in line by speeding up clock as apposed
# to a big bang/instantaneous sync - docs suggest time will be correct in ~10mins
#/usr/sbin/ntpd -gqc /dev/null uk.pool.ntp.org pool.ntp.org 2>/dev/null &
/usr/sbin/logrotate /etc/logrotate.conf
exit 0
Power Saving/Management
Saving
Every time a file is accessed on a *NIX filesystem (ls, vi etc) the access time attribute of the file is updated. With a lowpowered/slow netbook this behaviour is not desirable and the kernel can be told to behave so by modifying the mount options of the local filesystems./etc/fstab
/dev/mapper/vg-root / ext4 defaults,noatime 1 1
Depending on the size of the RAM installed (apparently up to 2GB for the HP Mini series, even though the Intel chipset can support 4GB) you may want the kernel to avoid the expensive write to swap. This can be acheived by lowering a dynamic kernel system properties towards 0; where 0 hints to the kernel to avoid swapping if possible./dev/mapper/vg-root / ext4 defaults,noatime 1 1
echo 10 >/proc/sys/vm/swappiness
This can be made more permanent in /etc/sysctl.conf as vm.swappiness = 10.Management
gsettings set org.gnome.settings-daemon.plugins.power percentage-critical 22
gsettings set org.gnome.settings-daemon.plugins.power percentage-action 20
gsettings set org.gnome.settings-daemon.plugins.power use-time-for-policy false
gsettings set org.gnome.settings-daemon.plugins.power critical-battery-action hibernate ## powerdown?? Find gsettings list-recursively
gsettings set org.gnome.settings-daemon.plugins.power percentage-action 20
gsettings set org.gnome.settings-daemon.plugins.power use-time-for-policy false
gsettings set org.gnome.settings-daemon.plugins.power critical-battery-action hibernate ## powerdown?? Find gsettings list-recursively
Suspend/Sleep
The kernel handles sleep/suspend to RAM well, in both the virtual terminals and also from X - closing the laptop lid automatically sends the machine into suspend/sleep.Hibernate
This is a little odd as the kernel does support hibernate out of the box (in X, the power button is already mapped to ask "shutdown|restart|sleep|hibernate" or via an explicitsystemctl hibernate) but on awake, the session is NOT restored - the machine comes up fresh. This behaviour appears to be a bug that is simple to solve by adding a
resume=... arg to the kernel boot parameters. The parameter needs to match the swap device of the system and can be referenced by UUID or by the device name.#check which is swap name/dev
$ swapon -s
Filename Type Size Used Priority
/dev/dm-1 partition 8126460 0 -1
$ dracut --print-cmdline
rd.lvm.lv=vg/root
rd.lvm.lv=vg/swap
resume=/dev/mapper/vg-swap root=/dev/mapper/vg-root rootflags=rw,relatime,seclabel,data=ordered rootfstype=ext4
In this example above from my machine the kernel arg $ swapon -s
Filename Type Size Used Priority
/dev/dm-1 partition 8126460 0 -1
$ dracut --print-cmdline
rd.lvm.lv=vg/root
rd.lvm.lv=vg/swap
resume=/dev/mapper/vg-swap root=/dev/mapper/vg-root rootflags=rw,relatime,seclabel,data=ordered rootfstype=ext4
resume= can be /dev/dm-1 or easier /dev/mapper/vg-swap. This change goes into:/etc/default/grub
GRUB_CMDLINE_LINUX="rd.lvm.lv=vg/swap rd.lvm.lv=vg/root resume=/dev/mapper/vg-swap"
and then running GRUB_CMDLINE_LINUX="rd.lvm.lv=vg/swap rd.lvm.lv=vg/root resume=/dev/mapper/vg-swap"
grub2-mkconfig -o /etc/grub2.cfg. Alternatively, if you don't want to rebuild the initramfs again you can modify the existing grub config./boot/grub2/grub.cfg
linux16 /vmlinuz-4.2.3-300.fc23.x86_64 root=/dev/mapper/vg-root ro rd.lvm.lv=vg/root rd.lvm.lv=vg/swap LANG=en_GB.UTF-8 resume=/dev/mapper/vg-swap
Remember that hibernation writes the running system image into the swap area that is then reinstated upon the next boot. Hibernation differs to suspen which uses RAM to store it's running system image and therefore needs power. Hibernation relies no power.linux16 /vmlinuz-4.2.3-300.fc23.x86_64 root=/dev/mapper/vg-root ro rd.lvm.lv=vg/root rd.lvm.lv=vg/swap LANG=en_GB.UTF-8 resume=/dev/mapper/vg-swap
During the installation phase, the
swap partition was givn 2.5Gb and this was with hibernation in mind - however, in most instances of typical usage the system runs well within 1Gb (RAM only, nothign swapped - verified by free or top and then vmstat showing no page in/outs). The Fedora documents do advice ~3x size of RAM for swap in 2-4Gb RAM sized systems.Additional System Services
NFS
$ dnf -y install nfs-utils
NFS server
$ mkdir /export/public
$ chmod 1775 /export/public
/etc/exports
# allow connections from everywhere
/export/public *(rw,sync,no_root_squash)
# allow connections on specified subnet
#/export/public 192.168.0.0/24(rw,sync,no_root_squash)
$ systemctl start rpcbind nfs-server
$ systemctl enable rpcbind nfs-server
$ chmod 1775 /export/public
/etc/exports
# allow connections from everywhere
/export/public *(rw,sync,no_root_squash)
# allow connections on specified subnet
#/export/public 192.168.0.0/24(rw,sync,no_root_squash)
$ systemctl start rpcbind nfs-server
$ systemctl enable rpcbind nfs-server
NFS client
$ systemctl start rpcbind nfs-mountd
$ systemctl enable rpcbind nfs-mountd
# testing
$ mount -t nfs localhost:/export/public /export/public
$ systemctl enable nfs-server.service
$ systemctl enable nfs.service
$ systemctl enable rpcbind nfs-mountd
# testing
$ mount -t nfs localhost:/export/public /export/public
$ systemctl enable nfs-server.service
$ systemctl enable nfs.service
Setup automount
$ dnf -y install autofs
/etc/auto.master
/~ /etc/auto.mount
#/etc/auto.mount
# /export/public -fstype-nfs,rw nfsserver:/export/public
$ systemctl start autofs
$ systemctl enable autofs
# testing
$ ls /net/localhost/export/public
/etc/auto.master
/~ /etc/auto.mount
#/etc/auto.mount
# /export/public -fstype-nfs,rw nfsserver:/export/public
$ systemctl start autofs
$ systemctl enable autofs
# testing
$ ls /net/localhost/export/public
NIS client/slave
/etc/nsswitch.conf
passwd: files nis
shadow: files nis
group: files nis
/etc/passwd # add to end
+::::::
# set NIS domain
$ ypdomainname nisdomain.com
$ echo "NISDOMAIN=nisdomain.com" >> /etc/sysconfig/network
# make sure that nis calls go to the known master
# and also localhost (since it has copies/is a slave master)
/etc/yp.conf
#ypserver fooypserver
#ypserver 127.0.0.1
domain nisdomain.com server fooypserver.nisdomain.com
domain nisdomain.com server 127.0.0.1
$ dnf -y install ypserv ypbind rpcbind yp-tools
# ensure that the ypserv/xferd/passwd is running on fooypserver
$ systemctl start rpcbind ypserv ypbind
$ systemctl enable rpcbind ypserv ypbind
# older F25
$ authconfig \
--enablenis \
--nisdomain=nisdomain.com \
--nisserver=fooypserver.nisdomain.com \
--enablemkhomedir \
--update
# with authselect
$ authselect select nis --force
The above works for authentication if the NIS master(s) are always available - at home, I have a desktop that I've used as the master and this is not always on. Therefore we can make this netbook a NIS slave (ie a secondary master) which means it will also have a copy of the master db files. This may appear to be the same as copying passwd/shadow/hosts file around but maintanence is MUCH easier as shown below.passwd: files nis
shadow: files nis
group: files nis
/etc/passwd # add to end
+::::::
# set NIS domain
$ ypdomainname nisdomain.com
$ echo "NISDOMAIN=nisdomain.com" >> /etc/sysconfig/network
# make sure that nis calls go to the known master
# and also localhost (since it has copies/is a slave master)
/etc/yp.conf
#ypserver fooypserver
#ypserver 127.0.0.1
domain nisdomain.com server fooypserver.nisdomain.com
domain nisdomain.com server 127.0.0.1
$ dnf -y install ypserv ypbind rpcbind yp-tools
# ensure that the ypserv/xferd/passwd is running on fooypserver
$ systemctl start rpcbind ypserv ypbind
$ systemctl enable rpcbind ypserv ypbind
# older F25
$ authconfig \
--enablenis \
--nisdomain=nisdomain.com \
--nisserver=fooypserver.nisdomain.com \
--enablemkhomedir \
--update
# with authselect
$ authselect select nis --force
$ dnf -y install ypserv rpcbind
$ systemctl start rpcbind ypserv ypxfrd yppasswdd
$ systemctl enable rpcbind ypserv ypxfrd yppasswdd
# sync with master (bring files locally)
$ /usr/lib64/yp/ypinit -s fooypserver
On NIS server (in this example, called fooypserver, broadcast the master yp db files to the network: $ systemctl start rpcbind ypserv ypxfrd yppasswdd
$ systemctl enable rpcbind ypserv ypxfrd yppasswdd
# sync with master (bring files locally)
$ /usr/lib64/yp/ypinit -s fooypserver
/var/yp/Makefile
NOPUSH=false
$ cd /var/yp && make # to push master db files out
The NIS server's master files are in NOPUSH=false
$ cd /var/yp && make # to push master db files out
/etc/yp/Samba
$ dnf -y install samba samba-client
# same as NFS dir
$ mkdir /export/public
$ chmod 1775 /export/public
/etc/samba/smb.conf
# match your windows workgroup name and hosts that can connect
workgroup = WORKGROUP
hosts allow = 127. 192.168.0.
logging = file
security = user
passdb backend = tdbsam
create mask = 0644
directory mask = 0755
# smbpasswd will update unix passwd too
#unix password sync = yes
#pam password change = y
# define what is shared and to who
[public]
comment = Public on %h (%D)
path = /export/public
public = yes
writable = yes
browseable = yes
printable = no
valid users = @users # accces only to "users" grp
$ systemctl start smb nmb
$ systemctl enable smb nmb
$ smbpasswd -a smbuser
$ pdbedit -L # confirm users in DB
From Windows, use the credentials # same as NFS dir
$ mkdir /export/public
$ chmod 1775 /export/public
/etc/samba/smb.conf
# match your windows workgroup name and hosts that can connect
workgroup = WORKGROUP
hosts allow = 127. 192.168.0.
logging = file
security = user
passdb backend = tdbsam
create mask = 0644
directory mask = 0755
# smbpasswd will update unix passwd too
#unix password sync = yes
#pam password change = y
# define what is shared and to who
[public]
comment = Public on %h (%D)
path = /export/public
public = yes
writable = yes
browseable = yes
printable = no
valid users = @users # accces only to "users" grp
$ systemctl start smb nmb
$ systemctl enable smb nmb
$ smbpasswd -a smbuser
$ pdbedit -L # confirm users in DB
smbuser and the assignd passwd from the above.FTPD
$ dnf -y install vsftpd
/etc/vsftpd/vsftpd.conf
anonymous_enable=YES
anon_root=/export/public # this needs not o+w otherwise ftpd fails
local_enable=YES # local users allowed to login
write_enable=YES # enable uploads (otherwise "550 Permission Denied")
local_umask=022
dirmessage_enable=YES
xferlog_enable=YES
connect_from_port_20=YES
xferlog_std_format=YES
listen=NO
listen_ipv6=YES
pam_service_name=vsftpd
userlist_enable=YES
tcp_wrappers=YES
$ servicectl start vsftpd.service
$ servicectl enable vsftpd.service
From Windows machines, anonymous ftp can be pulled via using /etc/vsftpd/vsftpd.conf
anonymous_enable=YES
anon_root=/export/public # this needs not o+w otherwise ftpd fails
local_enable=YES # local users allowed to login
write_enable=YES # enable uploads (otherwise "550 Permission Denied")
local_umask=022
dirmessage_enable=YES
xferlog_enable=YES
connect_from_port_20=YES
xferlog_std_format=YES
listen=NO
listen_ipv6=YES
pam_service_name=vsftpd
userlist_enable=YES
tcp_wrappers=YES
$ servicectl start vsftpd.service
$ servicectl enable vsftpd.service
wget -m ftp://ip_of_host/. As this will cause wget to connect as an anonymous, the ftpd will drop the user into /export/public and the recursive pull/mirror will be as expected.sudo
Some useful elevations in/etc/sudoersCmnd_Alias MAINT = /usr/bin/dnf, /usr/bin/rpm, /bin/systemctl, /sbin/rfkill, /sbin/ifconfig, /sbin/iwconfig, /bin/firewall-cmd, /usr/bin/nmcli, /usr/sbin/fdisk, /usr/sbin/gparted, /usr/sbin/mdadm
Cmnd_Alias KILL = /bin/kill
Cmnd_Alias MISC = /usr/bin/less, /usr/bin/mount, /usr/bin/chown, /usr/bin/chmod, /usr/bin/strace, /usr/bin/liveusb-creator /usr/bin/umount, /usr/sbin/lspci, /usr/bin/nmap,/usr/sbin/modprobe, /usr/bin/macchanger, /usr/sbin/losetup
Cmnd_Alias AIRNG = /usr/bin/aircrack-ng, /usr/bin/airdecap-ng, /usr/bin/airdecloak-ng, /usr/sbin/aireplay-ng, /usr/sbin/airmon-ng, /usr/sbin/airodump-ng
user hostname=PASSWD: KILL, MISC, MAINT
X
The monitor brightness is controllable via the hotkeys but the X system always seems to pull this back up to 100% even though the kernel boots and puts the LCD backlight to its lowest power as seen in/sys/class/backlight/acpi_video0/brightness with a value of 0. To resolve this, the System->Preferences->Power Management dialog must be used to bring the brightness down, to say 20%.The hotkeys work and are mapped correctly with the exception of the quickweb key (next to the power on/off key at the top left of the keyboard). The quickweb key has X mapping of
XF86HomePage and thus is recognised - therefore it can be assigned to open the default web browswer via System->Preferences->Keyboard Shortcuts.The default wallpaper is annoying but changing it globally so the XDM greeter and the lockscreen are also consistent is painful - I typically just want a solid colour. To fix this, we can modify the schema
/usr/share/glib-2.0/schemas/mate-fedora.gschema.override and its reference to picture-filename= followed by a recompile (glib-compile-schemas /usr/share/glib-2.0/schemas/ and restarting X) or can switch out the actual backgrounds referenced in the schema.$ cd /usr/share/backgrounds/f23/default/tv-wide
$ identify f23.png
f23.png PNG 3840x2160 3840x2160+0+0 8-bit sRGB 4.415MB 0.000u 0:00.000
$ convert -size 3840x2160 xc:#000000 f23.png # nice solid black
There are other sizes but for this netbook's screen size, the TV-wide background is the one to hack.$ identify f23.png
f23.png PNG 3840x2160 3840x2160+0+0 8-bit sRGB 4.415MB 0.000u 0:00.000
$ convert -size 3840x2160 xc:#000000 f23.png # nice solid black
Google Chrome
For some unknown reason, Firefox performs very slowly with some websites - Chrome is available (although it pulls in QT) that can be an alternative./etc/yum.repos.d/google-chrome.repo
[google-chrome]
name=google-chrome
baseurl=http://dl.google.com/linux/chrome/rpm/stable/x86_64
enabled=1
gpgcheck=1
gpgkey=https://dl.google.com/linux/linux_signing_key.pub
$ dnf -y install google-chrome-stable
[google-chrome]
name=google-chrome
baseurl=http://dl.google.com/linux/chrome/rpm/stable/x86_64
enabled=1
gpgcheck=1
gpgkey=https://dl.google.com/linux/linux_signing_key.pub
$ dnf -y install google-chrome-stable
Firefox
>about:config
browser.backspace_action = 0
browser.showQuitWarning = true
# install Sun's JRE plugin
$ cd /usr/lib64/mozilla/plugins && ln -s /usr/jre/lib/amd64/libnpjp2.so
Adobe Flash was not installed since it's resource heavy and youtube is now providing many of its files in html5.browser.backspace_action = 0
browser.showQuitWarning = true
# install Sun's JRE plugin
$ cd /usr/lib64/mozilla/plugins && ln -s /usr/jre/lib/amd64/libnpjp2.so
Misc
Moving from rc runlevels
Fedora has moved away from the old runlevels and such functionality handled:$ systemctl isolate multi-user.target # runlevel 3
$ systemctl isolate graphical.target # runlevel 5
$ systemctl isolate rescue.target # runlevel 1 (single user)
On kernel boot, append to the parameters: $ systemctl isolate graphical.target # runlevel 5
$ systemctl isolate rescue.target # runlevel 1 (single user)
systemd.unit=rescue (of perhaps =emergency).However
telinit 3 still works as expected.Mounted filesystems: IOS and MTP/PTP
IOS mount - gvfs/ifuse
$ dnf -y install ifuse #update gvfs-fuse
$ mkdir ~/iphone
# mount
$ ifuse ~/iphone
# unmount, no mount point required
$ fusermount -u
Plugging an IOS device will cause $ mkdir ~/iphone
# mount
$ ifuse ~/iphone
# unmount, no mount point required
$ fusermount -u
gvfs to automount and present it's available mounts under: /run/user/$(id -u)/gvfs/afc\:host=..../MTP mount - gvfs/simple-mtpfs
Plugging an MTP camera, like a Nikon D800 or D300, will cause gvfs to automount under: /run/user/$(id -u)/gvfs/gphoto2\:host\=..../$ dnf -y install simple-mtpfs
# find MTP devices
$ simple-mtpfs -l
# mount the device
$ simple-mtpfs ~/mtp
# find MTP devices
$ simple-mtpfs -l
# mount the device
$ simple-mtpfs ~/mtp
Misc Config
$ dnf -y install sshd telnet-server telnet
$ systemctl start sshd.service telnet.socket
$ systemctl enable sshd.service telnet.socket
$ dnf -y install aircrack-ng gcc g++ perl-ExtUtils-MakeMaker (for exiftool)
To modify the number of virtual terminals available is via $ systemctl start sshd.service telnet.socket
$ systemctl enable sshd.service telnet.socket
$ dnf -y install aircrack-ng gcc g++ perl-ExtUtils-MakeMaker (for exiftool)
/etc/systemd/logind.conf and the NAutoVTs=.... This setting will take effect after reboot but you can add another VT:$ systemctl start getty@tty8
It may also be useful to change the minimum-vt= in /etc/lightdm/lightdm.conf not to be 1 (leave that info up on screen)Packages via dnf/yum
- aircrack-ng macchanger
- gcc gcc-c++, cvs, subversion
- strace nmap tcpdump lshw ftp wireshark wireshark-gtk
- gimp
- libva libva-utils
- mpv youtube-dl mplayer ffmpeg lame sox
- vlc
- cdrecord dvd+rw-tools flickcurl exiv2 exiv2-devel
- ImageMagick ImageMagick-c++-develffmpegthumbnailer-devel
- liveusb-creator livecd-tools
- qpdf (merge files:
qpdf --empty --pages in0.pdf 1-2 in1.pdf 4-z -- out.pdfadd passwd:qpdf --empty --pages in0.pdf in1.pdf -- --encrypt foobar foobar 128 -- out.pdf) - HandBrake libdvdcss2 (via dnf config-manager --add-repo=http://negativo17.org/repos/fedora-handbrake.repo)
Misc Wifi
For libraries and office infrastructures, you may try WPA & WPA2 Enterprise networks, try PEAP authentication (with auto version detection), no certificate required and MSCHAPv2 - anonymous identify is left blank.The Atheros AR9285 wireless card also supports monitor mode and can also be used to create a wifi hotspot which allows the machine to act as a wireless access point; this functionality becomes useful if the location has no wifi but has ethernet access to the web in which the HP Mini 3025sa provides the wifi access to your devices.
Creating a wifi hotspot is easiest via the NetworkManager applet:
- create a new wifi network connection
- under
wi-fitab, enter the name of SSID withModeasHotspot. TheDevicesetting should list the interface (wlo1) and reflect the MAC of the wireless card
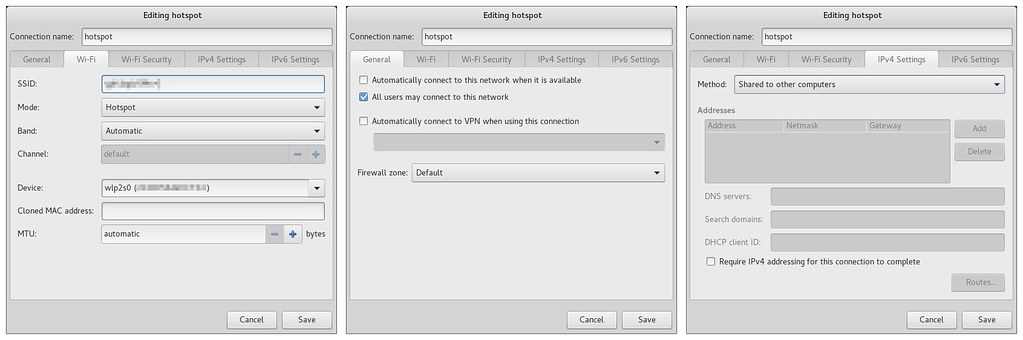
The password for your wifi access point is the only other option you need to set and the hotspot is now ready.
If the hotspot connection is named 3025sa-hotspot and the SSID is configured as 3025sa-SSID, then you will find the corresponding
ifcfg-3025a-hotspot and ifcfg-3025sa-SSID files created.To enable the hotspot, use the
NetworkManager applet's Connect to Hidden Wi-Fi Network... which will in turn bring up a dialogue allowing you to select the connections. In the Connections drop down you will see the hotspot connection 3025sa-hotspot; selecting this option and clicking Connect will bring up the wifi hotspot and allowing your other wifi devices to connect to the SSID called 3025sa-SSID. The 3025sa-SSID connection is also listed in the drop down but this is NOT want you want to select. If the machine wired via ethernet and has an internet connection, the wifi clients will also be able to access the internet.
No comments:
Post a Comment