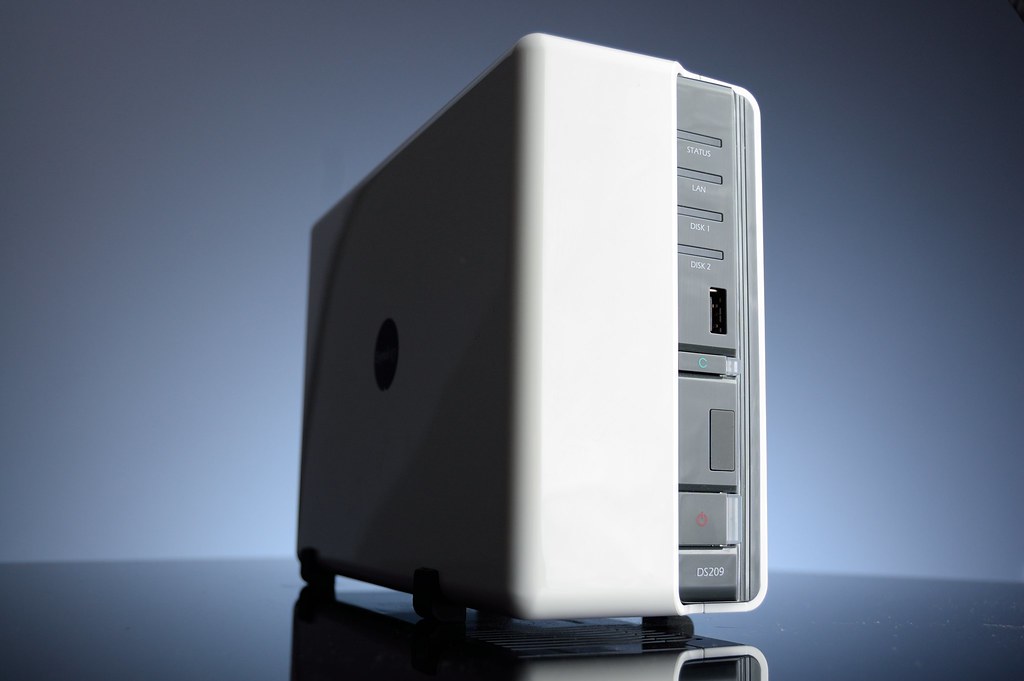
The NAS in question is a 2x bay/1x 1Gpbs NIC enabled Synology DS209 running, the last available DSM, DSM 4.2 and hosting 2x 1.5Tb disks as RAID1. The underling DSM OS is
BusyBox v1.16.1 (2016-04-28 18:03:53 CST) running a 2.6.32.12 armv5tel 32bit kernel.Upgrading the disks
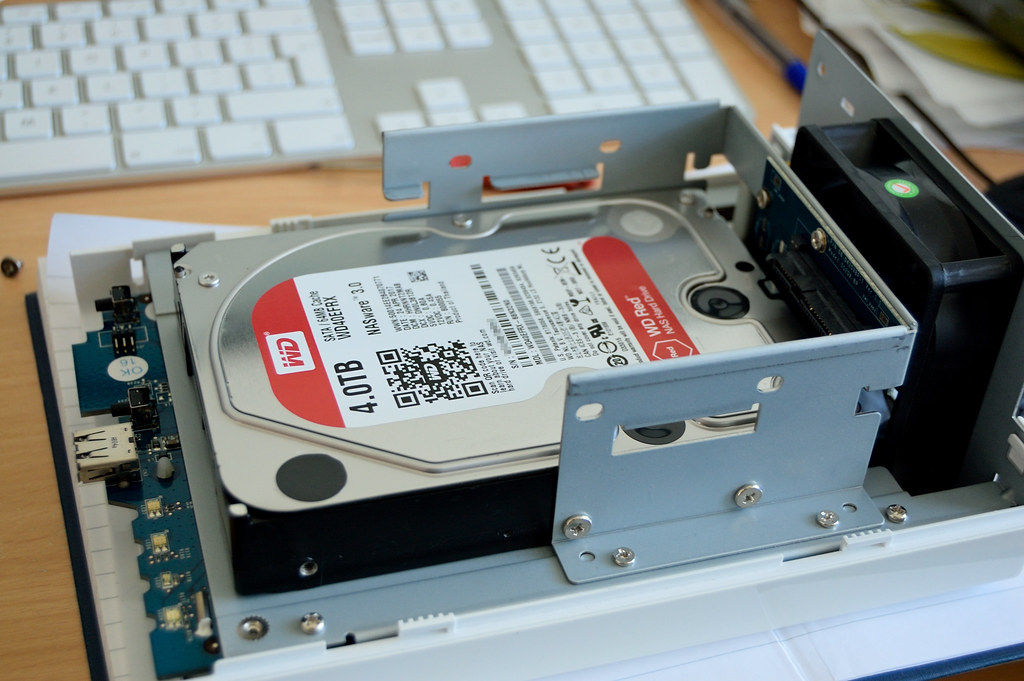
There are a number of good resources to describe in general what needs to be done; however, it is not immediately clear the max supported capacity. Originally the (~2009) marketting materials stated that the DS209 supported disks up to 2TB but this is no longer true; the unit can take 4TB disks but no more.The next uncertaintity is the underlying filesystem; my original 1.5TB disks automatically split into 3 parititions, with all of them using 4k blocks
ext3 filesystems and thus theoretically supporting 2TiB max file and 16TiB max file system sizes. Given that we can only use 4Tb disks, which in reality will be something like 3.6Tb, ext3 isn't a problem.The new larger disks would be a pair of WD Red NAS 4Tb drives.
Following the instructions for removal and migration are relatively pain free but it will take a long time. The details on the Synology help page shows a later DSM interface than DSM 4.2 but the process is the same.
- Power off NAS and replace a existing disk with larger disk and power cycle
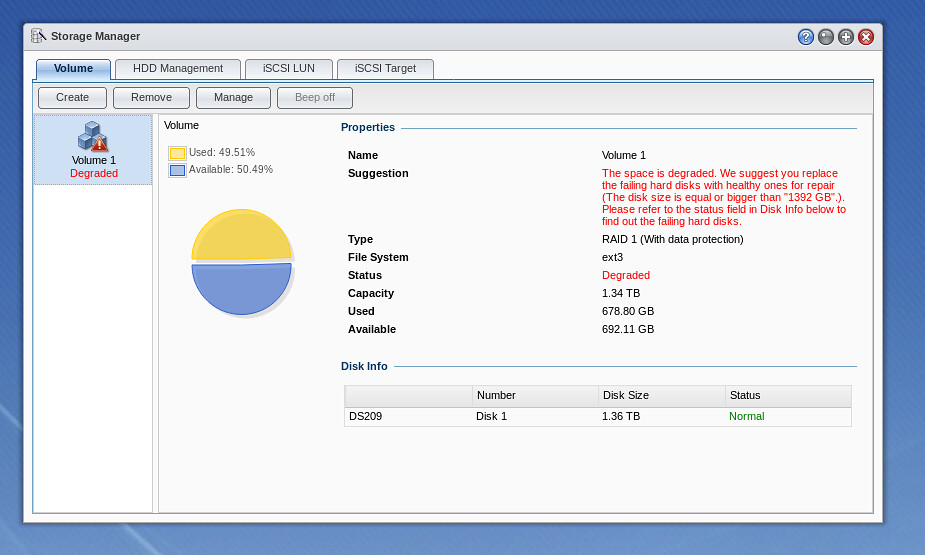
Device will beep but this can be disabled under Storage Manager. The system reports that the volume is degraded, which just means its found one of the disks is not what it expects - this is fine since this is a the new disk - Start the data sync process via Storage Managera and Manage,
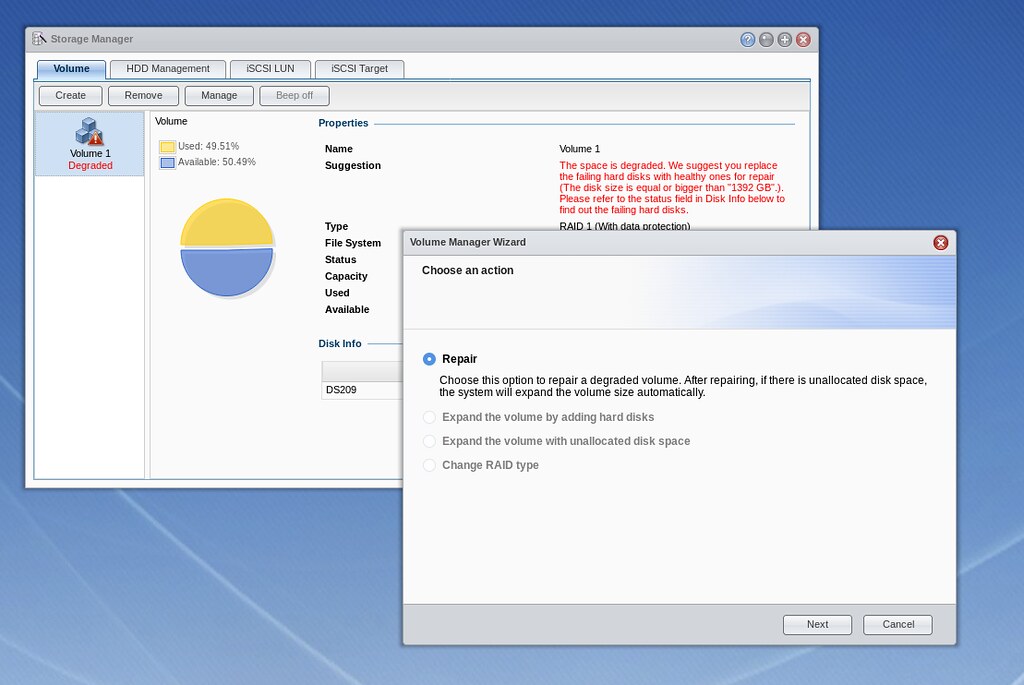
and start Repair which initialise the new disk and bring it in line with the existing disk in the the RAID1 array - Wait a looong time: for a 1.5Tb to 4Tb sync, it took ~4hrs 40min. During this process the status will show
Repairing(Checking parity consistency. x.xx%)
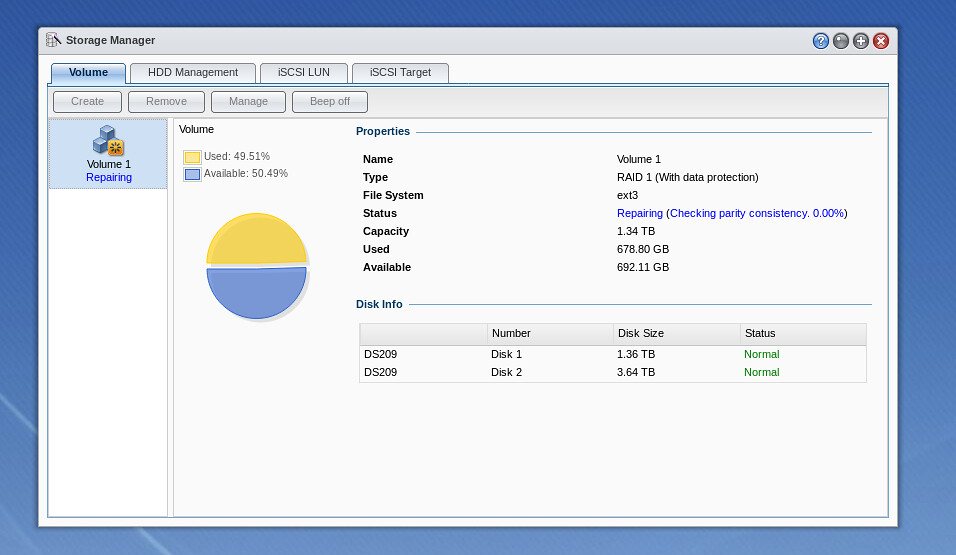
- Once this stage is comple, Status will Normal and at this point you can power off the device, replace the original smaller disk and Manage and Repair again
Note that on the second time of Repair this will also automatically resize the disks to max size but this is incredible slow; the combined time for data sync and filesystem expansion took ~7hrs 30mins for the second disk.
One annoying (or potentially worrying) element during the sync/extend stage is that it is clearly 2 stages; sync the 2nd disks with the same data and then expand the RAID1 filesystem on both devices to max. If you are periodically checking on the Status line in the GUI, you may notice that the
Repairing(Checking parity consistency. x.xx%) will recycle to 0.00%. For me, the Status went from 0 to 100% and then back down to 38.5% (assuming this is finishing processing of the original 1.5Tb data) and then climbed up again to 100%; original 1.5tb / 4tb ~ 37.5%. looks like it working its way up to the available size (4Tb). Once the status reaches 100% again, the RAID volume/filesystem is extended and at this point you can hear the disks working hard; the file system extension took about 1hr.
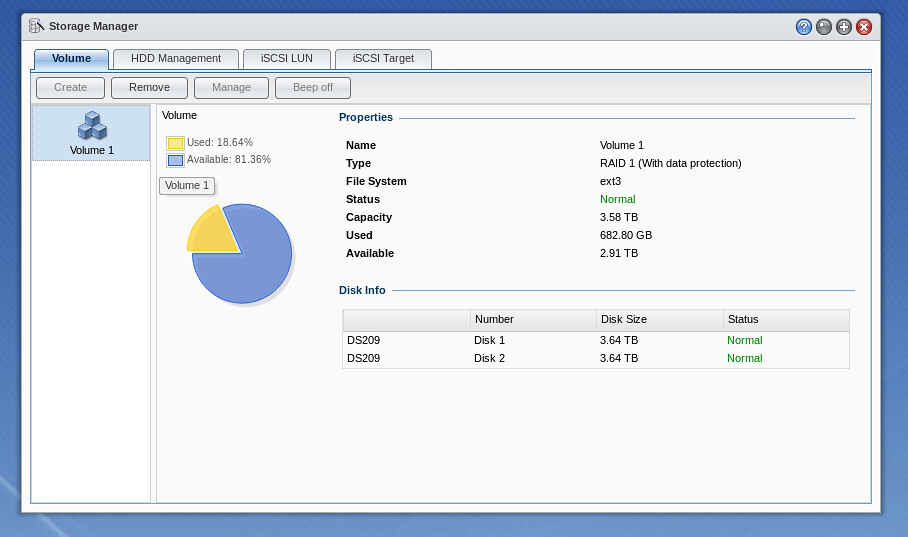
In total, the migration from the 1.5Tb disks to the new 4Tb disks took ~14.5hrs broken down to:
- ~4hrs 40min: replace 1st 1.5Tb disk with 4Tb and rebuild:
- ~3hrs 20min: replace 2nd 1.5Tb disk with 4Tb and rebuild from 4Tb disk:
- ~5hrs 10min: disk consistency check for new space (1.5-4Tb range)
- ~1hrs: extend filesystem to fill available space
The original disks
Now that the NAS storage has been upgraded, we have the 2x 1.5Tb disks. One of these disks will be put in temporary storage as backup in case of new h/w disk failures but we now have a spare disk.The original disks can be plugged into another machine or a USB enclosure but again, there's some items to consider - when using a modern Linux desktop, a lot of these systems will try to automount devices which may get this wrong. For instance, when using one of the original disks in an USB enclosure:
$ dmesg
....
[21846.507870] usb 1-1.2: new high-speed USB device number 4 using ehci-pci
[21846.667016] usb 1-1.2: New USB device found, idVendor=0080, idProduct=a001
[21846.667023] usb 1-1.2: New USB device strings: Mfr=1, Product=2, SerialNumber=3
[21846.667026] usb 1-1.2: Product: External USB 3.0
[21846.667029] usb 1-1.2: Manufacturer: TOSHIBA
[21846.667032] usb 1-1.2: SerialNumber: 201503310007B
[21846.669080] scsi host7: uas
[21846.670957] scsi 7:0:0:0: Direct-Access TO Exter nal USB 3.0 0103 PQ: 0 ANSI: 6
[21846.710644] sd 7:0:0:0: Attached scsi generic sg4 type 0
[21846.711086] sd 7:0:0:0: [sdd] 2930277168 512-byte logical blocks: (1.50 TB/1.36 TiB)
[21846.711092] sd 7:0:0:0: [sdd] 4096-byte physical blocks
[21846.712271] sd 7:0:0:0: [sdd] Write Protect is off
[21846.712277] sd 7:0:0:0: [sdd] Mode Sense: 5f 00 00 08
[21846.712766] sd 7:0:0:0: [sdd] Write cache: enabled, read cache: enabled, doesn't support DPO or FUA
[21846.739567] sdd: sdd1 sdd2 sdd3
[21846.742397] sd 7:0:0:0: [sdd] Attached SCSI disk
[21847.036892] md: bind
$ cat /proc/mdstat
Personalities :
md127 : inactive sdd3[1](S)
1460417308 blocks super 1.1
unused devices:
However you are unable to mount the raw device (....
[21846.507870] usb 1-1.2: new high-speed USB device number 4 using ehci-pci
[21846.667016] usb 1-1.2: New USB device found, idVendor=0080, idProduct=a001
[21846.667023] usb 1-1.2: New USB device strings: Mfr=1, Product=2, SerialNumber=3
[21846.667026] usb 1-1.2: Product: External USB 3.0
[21846.667029] usb 1-1.2: Manufacturer: TOSHIBA
[21846.667032] usb 1-1.2: SerialNumber: 201503310007B
[21846.669080] scsi host7: uas
[21846.670957] scsi 7:0:0:0: Direct-Access TO Exter nal USB 3.0 0103 PQ: 0 ANSI: 6
[21846.710644] sd 7:0:0:0: Attached scsi generic sg4 type 0
[21846.711086] sd 7:0:0:0: [sdd] 2930277168 512-byte logical blocks: (1.50 TB/1.36 TiB)
[21846.711092] sd 7:0:0:0: [sdd] 4096-byte physical blocks
[21846.712271] sd 7:0:0:0: [sdd] Write Protect is off
[21846.712277] sd 7:0:0:0: [sdd] Mode Sense: 5f 00 00 08
[21846.712766] sd 7:0:0:0: [sdd] Write cache: enabled, read cache: enabled, doesn't support DPO or FUA
[21846.739567] sdd: sdd1 sdd2 sdd3
[21846.742397] sd 7:0:0:0: [sdd] Attached SCSI disk
[21847.036892] md: bind
$ cat /proc/mdstat
Personalities :
md127 : inactive sdd3[1](S)
1460417308 blocks super 1.1
unused devices:
/dev/hda3) nor the RAID device (/dev/md127). Even when trying to force RAID assembly, via mdadm -Asf, we are unable to mount.# mdadm --stop /dev/md127
mdadm: stopped /dev/md127
# cat /proc/mdstat
Personalities :
unused devices:
$ mount /dev/sdd3 /mnt -o ro
mount: unknown filesystem type 'linux_raid_member'
# mdadm --examine --scan
ARRAY /dev/md/2 metadata=1.1 UUID=888a5a25:a85ce345:9734df43:8aba568d name=doc:2
# mdadm --detail /dev/md127
/dev/md127:
Version : 1.1
Raid Level : raid0
Total Devices : 1
Persistence : Superblock is persistent
State : inactive
Name : doc:2
UUID : 888a5a25:a85ce345:9734df43:8aba568d
Events : 32
Number Major Minor RaidDevice
- 8 51 - /dev/sdd3
# mdadm -Asf
mdadm: No arrays found in config file or automatically
The give-away is the details in
/proc/mdstat with no personalities defined (expect to see 'raid1' listed) and the 'S' flag which indicates this device is spair so it suggest the RAID is in an inconsistent state and it because of Fedora's auto disk/volume management.The solution to this is to stop any RAID array that the system is starting up upon insert and then to rebuild.
# mdadm --stop /dev/md127
mdadm: stopped /dev/md127
# mdadm -Asf
mdadm: /dev/md/doc:2 has been started with 1 drive (out of 2).
# cat /proc/mdstat
Personalities : [raid1]
md127 : active raid1 sdd3[1]
1460417308 blocks super 1.1 [2/1] [_U]
unused devices:
# mdadm --detail /dev/md127
/dev/md127:
Version : 1.1
Creation Time : Tue Jun 15 20:38:16 2010
Raid Level : raid1
Array Size : 1460417308 (1392.76 GiB 1495.47 GB)
Used Dev Size : 1460417308 (1392.76 GiB 1495.47 GB)
Raid Devices : 2
Total Devices : 1
Persistence : Superblock is persistent
Update Time : Tue Jul 18 09:01:15 2017
State : clean, degraded
Active Devices : 1
Working Devices : 1
Failed Devices : 0
Spare Devices : 0
Name : doc:2
UUID : 888a5a25:a85ce345:9734df43:8aba568d
Events : 32
Number Major Minor RaidDevice State
- 0 0 0 removed
1 8 51 1 active sync /dev/sdd3
# mount /dev/md127 /mnt -o ro
successfully mounted!
# demsg
[25606.372609] md: unbind
[25606.386514] md: export_rdev(sdd3)
[25628.295915] md: md127 stopped.
[25628.297351] md: bind
[25628.319860] md: raid1 personality registered for level 1
[25628.320668] md127: Warning: Device sdd3 is misaligned
[25628.320672] md/raid1:md127: active with 1 out of 2 mirrors
[25628.320703] md127: detected capacity change from 0 to 1495467323392
[25695.748336] EXT4-fs (md127): mounting ext3 file system using the ext4 subsystem
[25695.837556] EXT4-fs (md127): mounted filesystem with ordered data mode. Opts: (null)
Repurposing Original drives
If you're not paranoid, you could use one of the original 1.5Tb disks with a potential being to add or replace an internal disk in another machine. My main PC is an old Dell Vostro 430 which has a paltry 160GB Samsung disk that hosts my Windows 7 installation. One of the Seagates would seem like a sensible upgrade and cloning the Windows system disk is not difficult.CloneZilla is a great little (~250Mb) Debian based live CD/USB distribution that can perform, amongst other disk functions, disk-to-disk cloning. I've used this in the past when cloning a laptop disk onto a replacement SSD with success. CloneZilla was duly downloaded and burned onto a bootable CD from a pre-made ISO made - this Dell Vostro, for whatever reason, can not boot from USB sticks (small, large, fat16, fat32) even though the same USB sticks boot fine in other machines. Once the Seagate was attached to the internal power and SATA cable the machine was powered on and once CloneZilla is booting to it's grub menu, you can choose to boot into RAM and the system then presents you a set of options for your disk-disk clone.
I followed the normal process of selecting disk-to-disk cloning and in expert mode, unselected the option to resize the partitions to the full size of the disk since I wanted a like-for-like disk copy. The other option I unselected was to re-install grub. The process starts and when completed (took about 25mins to disk clone via the SATA 2 interfaces), the original factory Samsung drive was replace with the Seagate and the PC boots from the new disk and into Windows 7 with no issues, not even Windows activation hell.
Obviously, this didn't run as smoothly as this the first time round - I noticed that the first time I performed the cloning, CloneZilla did complain about cloning
/dev/sda2 onto the new disk and some vague report of disk busy (I forget). When this final disk clone was booted, the PC reported "missing operating system". Given that I know CloneZilla works, I had another go but this time I manually deleted the partitions from the Seagate disk using fdisk and indeed the second cloning operation was a success. I wonder whether fact that the fresh-out-of-NAS Seagate with its RAID configuration confused CloneZilla but in the end, CloneZilla did its job and I've been able to repurpose one of the original NAS disks ... no point in having 2 old disks sitting just in case I need to rescue the Synology migration; if such a Synology restore would be necessary, I would be looking to transfer the data back to the NAS over the network using the original disk mounted as a single RAID1 volume on another Linux box.
1 comment:
Good info, thanks!
Post a Comment